Creating Automation Curves
The most important automation curves volume and pan can be activated for the selected track with the vol and pan buttons at the track header or via keyboard shortcut:
|
Volume: |
Alt + K |
|
Pan: |
Alt + P |
If other parameters are to be automated, you can set the parameter either
- in the Automation context menu or menu Automation or
- in the track head of an Automation Lane or
- via keyboard shortcut Ctrl + Alt + Control element in the Mixer or the interface of a plug-in or
- in the VST parameters dialog.
Automation Context Menu or Menu Automation
In the Automation menu or Automation context menu (click on the parameter field over the Automation slider at the very bottom of the Main section of the Track Editor) you can select an automation parameter.
The Automation menu and the Automation context menu contain the same entries, so in the following we will refer to this as Automation menu in general.
At the bottom of the menu, depending on the loaded plug-ins and effects, all available parameters are listed in submenus. Select the parameter you want.
All existing active or inactive automation curves are listed at the top of the menu. There you can select a curve that you can control during playback using the automation slider in the track editor. Also all commands in submenu Edit selected curve… refer to this curve.
The curve of the selected parameter is displayed in a new Automation Lane. The curves can also be displayed directly in the track, for details see Display of automation curves in the project.
Ctrl + Alt + Control Element
This is the fastest and smoothest way to automate a plug-in parameter. In the mixer or track editor, click a control (volume, pan, aux sends, EQ) or in the interface of a plug-in, click the control of a parameter while holding down the Ctrl and Alt keys. In the stopped state, a corresponding curve is only created; during playback, a change in the parameter is recorded directly, regardless of the selected automation mode.
Note: This works only with tracks, and not for the automation of object effects.
With plug-ins, this function can also be carried out by first selecting the menu item Automate next parameter in the menu Plug-in of the VST plug-in dialog and then moving a control element.
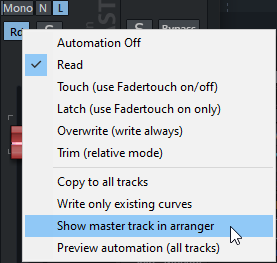
Automating the Master Track
Volume and effect settings for the master track can be automated. To edit these track curves, you must display the master track in the arranger. To do this, in the context menu of the automation button of the master in the mixer window, select Show master track in arranger. An additional track called "Master" is now displayed in the arranger.
You can also make the master track visible in the project window via the track manager: To do this, activate the track Master in the column Arrangement at the very bottom.